Previous Page

nihilist - 06 / 08 / 2020

Nginx Nextcloud Server Setup

Rent a VPS with debian 10+ (or just run it yourself, but make sure it is correctly port forwarded so that public ip points to the machine like a vps).

click here for the arch linux version

Once you have ssh'd into your debian server, we can start:

Setting up php7.4 and pgsql


First we get every package we need:


apt update -y && apt upgrade -y
apt -y install apt-transport-https lsb-release ca-certificates curl gnupg -y
sh -c 'echo "deb http://apt.postgresql.org/pub/repos/apt $(lsb_release -cs)-pgdg main" > /etc/apt/sources.list.d/pgdg.list'
wget --quiet -O - https://www.postgresql.org/media/keys/ACCC4CF8.asc | apt-key add -

apt update -y
apt install sudo socat wget unzip zip postgresql-13 nginx php7.4-{xml,json,intl,dev,common,fpm,curl,cli,pgsql,gd,common,mbstring,zip,soap,bz2} -y

Once that's done, start nginx and cd into php7.4 to edit the 2 php.ini and www.conf


systemctl enable --now nginx
systemctl status nginx

cd /etc/php/7.4/

echo 'date.timezone = Europe/Paris' >> fpm/php.ini
echo 'date.timezone = Europe/Paris' >> cli/php.ini

echo 'cgi.fix_pathinfo=0' >> fpm/php.ini
echo 'cgi.fix_pathinfo=0' >> cli/php.ini

echo 'env[HOSTNAME] = $HOSTNAME' >> fpm/pool.d/www.conf
echo 'env[PATH] = /usr/local/bin:/usr/bin:/bin' >> fpm/pool.d/www.conf
echo 'env[TMP] = /tmp' >> fpm/pool.d/www.conf
echo 'env[TMPDIR] = /tmp' >> fpm/pool.d/www.conf
echo 'env[TEMP] = /tmp' >> fpm/pool.d/www.conf

Once that's done, restart php7.4-fpm and start postgres:


systemctl enable --now php7.4-fpm

systemctl enable --now postgresql 
systemctl status postgresql

Once that's done you will start the postgresql secure installation:


useradd nextcloud -s /bin/bash 
sudo -u postgres psql


CREATE USER nextcloud;
CREATE DATABASE nextcloud;
ALTER DATABASE nextcloud OWNER TO nextcloud;
GRANT ALL PRIVILEGES ON DATABASE nextcloud TO nextcloud;
\q

Certbot Certificate and Nginx Configuration


From here we need to install our letsencrypt certificate. If you don't have a domain name yet, go get one, or just go for the free alternative DuckDNS and get one, mine currently is ech2.duckdns.org

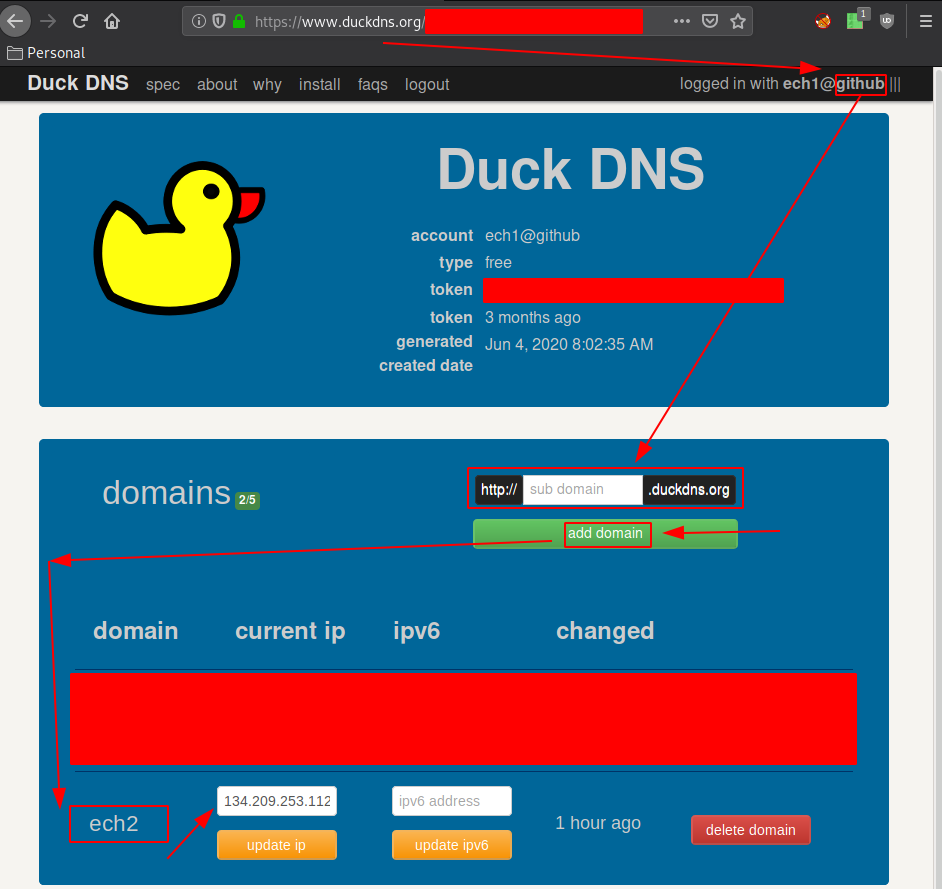
So we know the server is now "ech2.duckdns.org" you can browse to it and see that nginx is active. now we'll install the certificate using certbot:


wget -O - https://get.acme.sh | sh
cd ~
source .bashrc
systemctl stop nginx
acme.sh --issue --standalone -d ech2.duckdns.org -k 4096
systemctl start nginx

This puts the certificate into /root/.acme.sh/ech2.duckdns.org/

Once that's done, we can download the latest nextcloud zipfile:


cd /var/www/
wget -q https://download.nextcloud.com/server/releases/latest.zip

unzip -qq latest.zip
sudo chown -R nextcloud:www-data /var/www/nextcloud

Once that's done, go and modify the nginx configuration:


cd /etc/nginx/sites-available/
wget https://blog.nihilism.network/servers/nextcloud/nginx.conf -O nextcloud.conf
nano nextcloud.conf

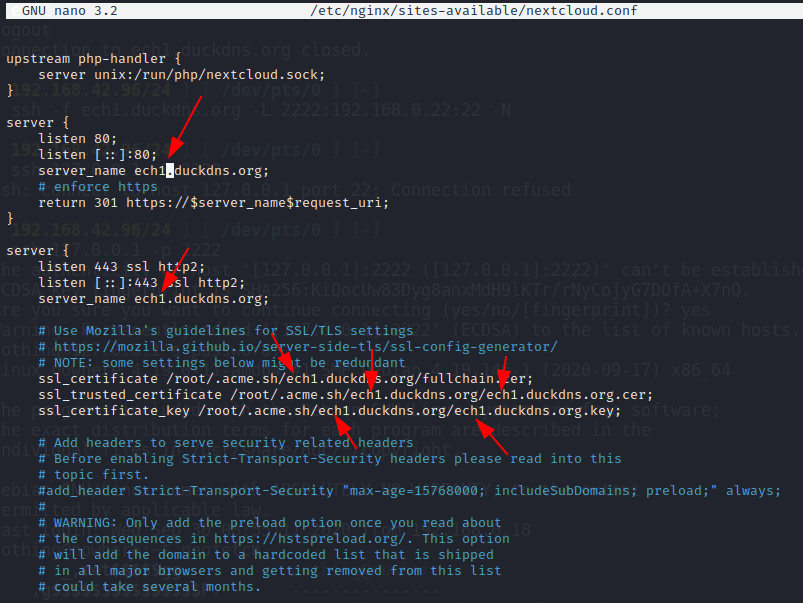
From here you need to modify the ech2.duckdns.org into whatever your domain name is. from nano you can do CTRL+W ech2.duckdns.org ENTER to find where the text is. do CTRL+X y when you're done, to save the file.


ln -s /etc/nginx/sites-available/nextcloud.conf /etc/nginx/sites-enabled/
nginx -t

Once you're here, nginx should say that the configuration doesn't have any errors. Now we need to restart nginx and php7.4-fpm:


nginx -s reload 
wget https://blog.nihilism.network/servers/nextcloud/nextcloud.conf -O /etc/php/7.4/fpm/pool.d/nextcloud.conf
systemctl restart php7.4-fpm

From here, just browse to your server at https://ech2.duckdns.org/ and you should be greeted by the following webpage:

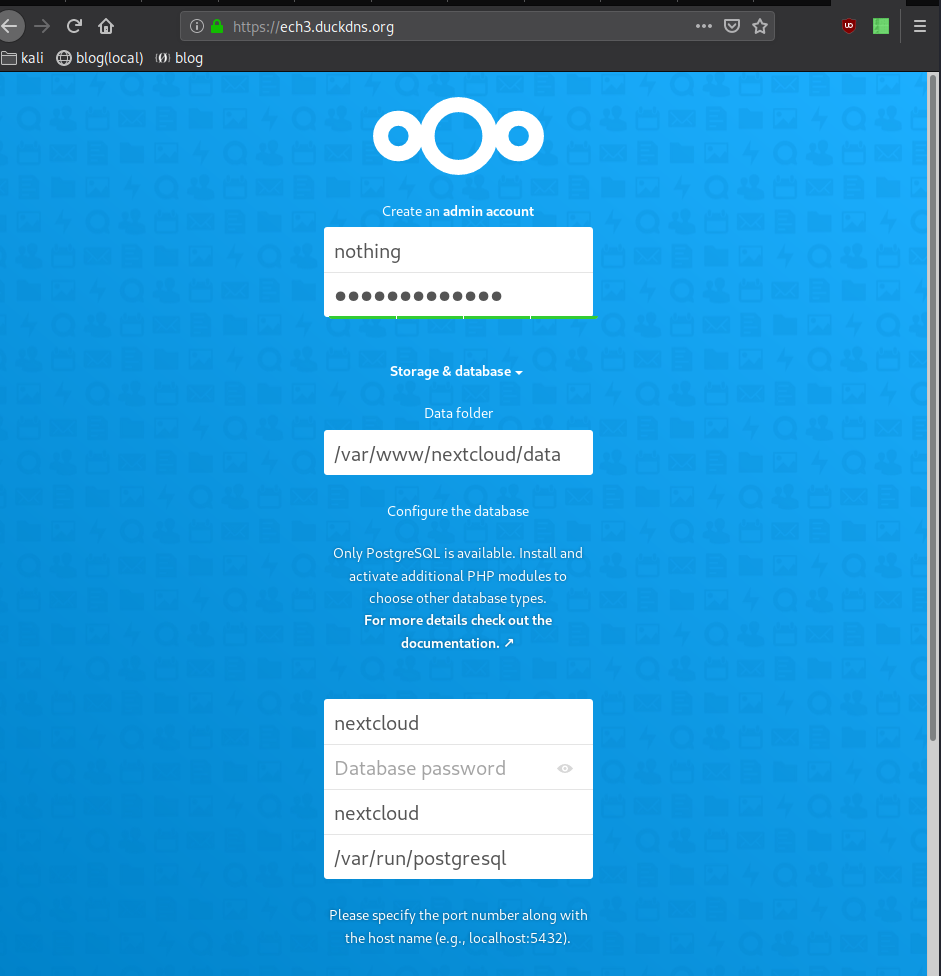
Please make sure that each prompt field is correct (apart from the first 2 , you get to pick which your admin credentials)

At the top just create the admin account with credentials you choose, then below you need to input the postgresql credentials from earlier: "nextcloud with no password" and you should be able to get in your nextcloud instance:

And we're done! Or so we think! We have been able to install a nextcloud instance on debian10 using duckdns, nginx and php7.4-fpm But we still need to harden it, check out the errors in the overview dashboard and fix them one by one:

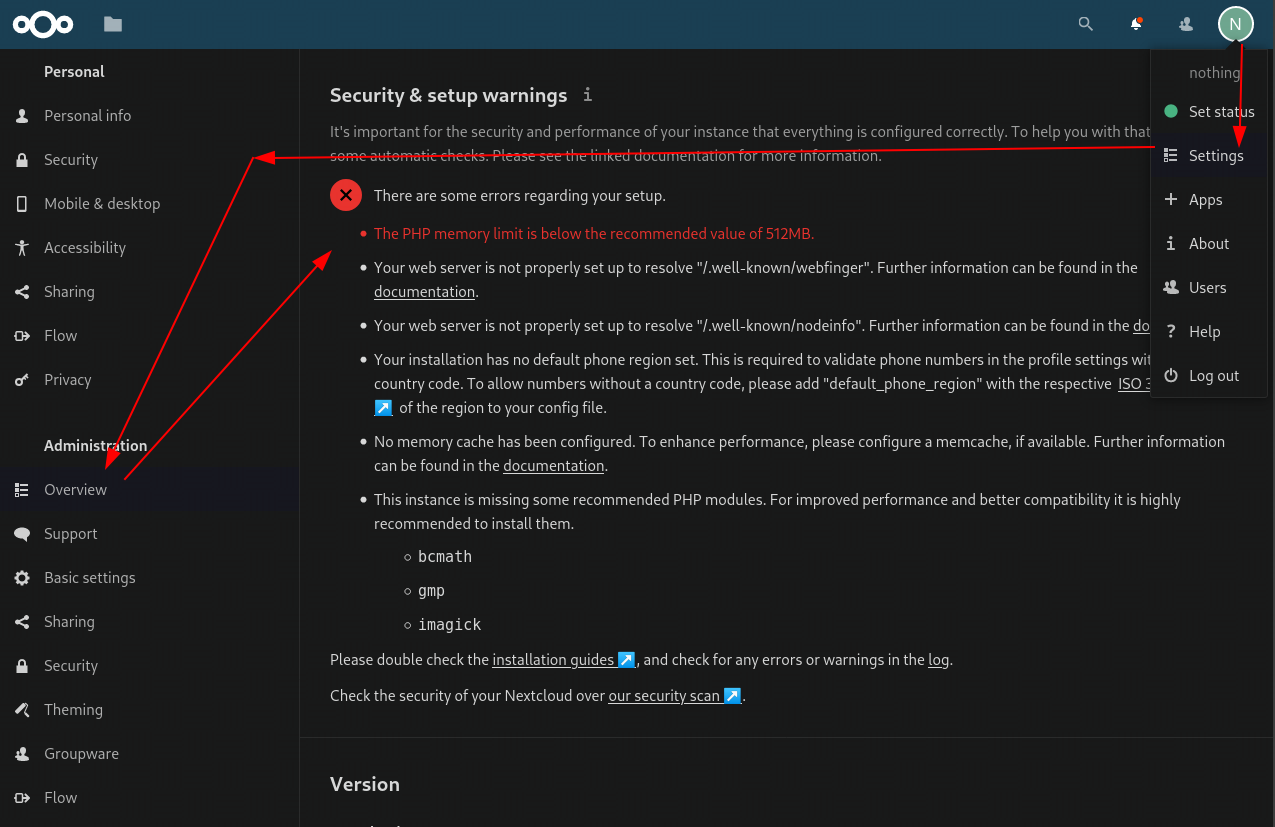
Starting with the php memory limit:


vim /etc/php/7.4/fpm/php.ini

[...]
memory_limit = 2048M
[...]

:wq
systemctl restart php7.4-fpm

next fix any potential missing php libraries and configure php-apcu:


apt install php-apcu php-imagick php7.4-{bcmath,gmp,imagick} php-xml-svg -y

vim /etc/php/7.4/fpm/pool.d/nextcloud.conf

pm = dynamic
pm.max_children = 120
pm.start_servers = 12
pm.min_spare_servers = 6
pm.max_spare_servers = 18

:wq

systemctl restart php7.4-fpm

Now for the memcache error:


vim /var/www/nextcloud/config/config.php

[...]

  'memcache.local' => '\OC\Memcache\APCu',
);

:wq

Now for the SVG error:


apt install libmagickcore-6.q16-6-extra -y

Now for the ~/.well-known/webfinger error:


vim /etc/nginx/sites-available/cloud.nihilism.network.conf

location ^~ /.well-known {
        # The following 6 rules are borrowed from `.htaccess`

        location = /.well-known/carddav     { return 301 /remote.php/dav/; }
        location = /.well-known/caldav      { return 301 /remote.php/dav/; }
        # Anything else is dynamically handled by Nextcloud
        location ^~ /.well-known            { return 301 /index.php$uri; }

        try_files $uri $uri/ =404;
}

:wq

systemctl restart nginx

And lastly the default phone region:


vim /var/www/nextcloud/config/config.php

[...]

  'default_phone_region' => 'FR',
);

:wq

systemctl restart php7.4-fpm

And at last just refresh your browser:

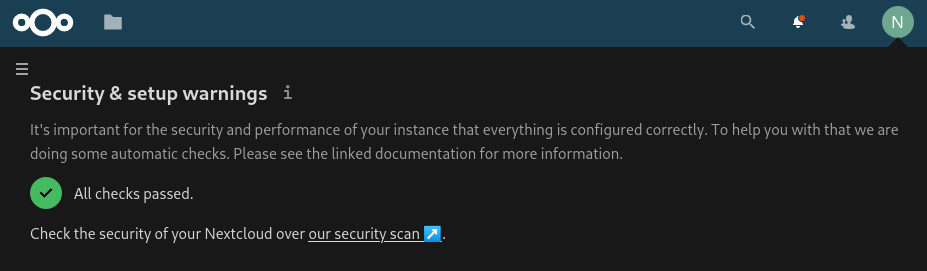
And that's it! We correctly hardened our nextcloud instance.

Post-Installation


Now from here you can make backups just in case if the server goes down or harddrive gets corrupted, etc. You could use a script like this:


#!/bin/bash
#this must run as root !
if [ "$EUID" -ne 0 ]
then
        echo 'MUST RUN AS ROOT!'
        exit
fi

cd /var/www/nextcloud/data/nothing/files/
#make sure the path to your  user is correct!

#run it at 3AM
cooldate=$(date --iso-8601)
echo $cooldate

rm backup*.zip
rm backup-$cooldate.zip
zip -r backup-$cooldate.zip /var/www/nextcloud/data/nothing/files/

#rsync backup-$cooldate.zip nothing@10.0.0.10:/home/nothing/backup/
rsync backup-$cooldate.zip nothing@mainpc:/home/nothing/backup/

rm backup*.zip

#crontab -e
#0 3 * * * /bin/bash /var/www/nextcloud/data/nothing/files/backup.sh

#chmod u+x backup.shg

#BACKUP_SERVER (here its 10.0.0.10)
#https://git.nihilism.network/nothing/serverside/blob/master/ssh/ssh.sh
#use this script to setup the key based ssh authentication, and then make sure your nextcloud server's root user has the private ssh key.

Here i can make rsync login via ssh to my mainpc host thanks to the private key ssh authentication specified in ~/.ssh/config:


root@home:/var/www/nextcloud/data/nothing/files# apt install rsync -y
root@home:/var/www/nextcloud/data/nothing/files# cat ~/.ssh/config
Host mainpc
        Hostname 10.0.0.10
        IdentityFile ~/.ssh/mainpc-10.pkey
        User nothing

of course you would have created the ssh keys on your remote host (in this case : 192.168.0.18) and placed the private key in the server's /root/.ssh/ folder. as comments at the end of the script imply, you can setup the cronjob to run backup.sh every day at 3 AM.g

Now in order to mount your files as a webdav share on linux you can do the following:


[ 10.55.55.2/32 ] [ /dev/pts/42 ] [~]
→ apt-get install davfs2

 [ 10.55.55.2/32 ] [ /dev/pts/42 ] [~]
→ sudo mkdir /mnt/cloud.nihilism.network

[ 10.55.55.2/32 ] [ /dev/pts/42 ] [~]
→ sudo chown -R nothing:nothing /mnt/cloud.nihilism.network

[ 10.55.55.2/32 ] [ /dev/pts/42 ] [~]
→ sudo mount -t davfs -o noexec https://cloud.nihilism.network/remote.php/webdav/ /mnt/cloud.nihilism.network/
Please enter the username to authenticate with server
https://cloud.nihilism.network/remote.php/webdav/ or hit enter for none.
  Username: nothing
Please enter the password to authenticate user nothing with server
https://cloud.nihilism.network/remote.php/webdav/ or hit enter for none.
  Password:
/usr/bin/mount.davfs: warning: the server does not support locks

[ 10.55.55.2/32 ] [ /dev/pts/42 ] [~]
→ cd /mnt/cloud.nihilism.network

[ 10.55.55.2/32 ] [ /dev/pts/42 ] [/mnt/cloud.nihilism.network]
→ ls
 backup.sh   Caldera   Certs   Cours   Crypto   Documents   id_ed25519   KEEPASS.txt   lost+found   Notes   nothing.ovpn   Passwords.kdbx   Photos   Random_Files   Readme.md   SSH   Templates  'nihilism.network setup'

Now in order to make it persistant accross reboots, you need to make a fstab entry:


[ 10.55.55.2/32 ] [ /dev/pts/42 ] [~]
→ sudo vim /etc/fstab

[ 10.55.55.2/32 ] [ /dev/pts/42 ] [~]
→ cat /etc/fstab

#webdav entry
https://cloud.nihilism.network/remote.php/webdav/ /mnt/cloud.nihilism.network davfs _netdev,noauto,user,uid=nothing,gid=nothing 0 0

[ 10.55.55.2/32 ] [ /dev/pts/42 ] [~]
→ sudo vim /etc/davfs2/secrets

[ 10.55.55.2/32 ] [ /dev/pts/42 ] [~]
→ sudo cat /etc/davfs2/secrets | tail -n2
# personal webdav, nextcloud application password
/mnt/cloud.nihilism.network nothing "mypassword"

[ 10.55.55.2/32 ] [ /dev/pts/42 ] [~]
→ sudo mount /mnt/cloud.nihilism.network/
/usr/bin/mount.davfs: warning: the server does not support locks

And that's it ! your nextcloud files have been mounted on a linux host.


[ 10.55.55.2/32 ] [ /dev/pts/42 ] [~]
→ cd /mnt/cloud.nihilism.network

[ 10.55.55.2/32 ] [ /dev/pts/42 ] [/mnt/cloud.nihilism.network]
→ ls -l
total 46
-rw-r--r-- 1 nothing nothing   859 Apr  7  2021  backup.sh
drwxr-xr-x 3 nothing nothing     0 Feb 16 13:14  Caldera
drwxr-xr-x 9 nothing nothing     0 Jan 20 20:54  Certs
drwxr-xr-x 8 nothing nothing     0 Mar 21 20:34  Cours
drwxr-xr-x 2 nothing nothing     0 Oct 27 09:05  Crypto
drwxr-xr-x 2 nothing nothing     0 Apr  7  2021  Documents
-rw-r--r-- 1 nothing nothing   411 Apr  7  2021  id_ed25519
-rw-r--r-- 1 nothing nothing    55 Apr  7  2021  KEEPASS.txt
drwx------ 2 nothing nothing     0 Mar 27 14:07  lost+found
drwxr-xr-x 2 nothing nothing     0 Aug 23  2021  Notes
-rw-r--r-- 1 nothing nothing  2914 Apr  7  2021  nothing.ovpn
-rw-r--r-- 1 nothing nothing 40510 Mar 26 21:40  Passwords.kdbx
drwxr-xr-x 2 nothing nothing     0 Apr  7  2021  Photos
drwxr-xr-x 9 nothing nothing     0 Mar 25 09:42  Random_Files
-rw-r--r-- 1 nothing nothing     1 May 27  2021  Readme.md
drwxr-xr-x 7 nothing nothing     0 Jul  1  2021  SSH
drwxr-xr-x 2 nothing nothing     0 Apr  7  2021  Templates
drwxr-xr-x 2 nothing nothing     0 Jun  6  2021 'nihilism.network setup'

Special thanks to skid9000 from the anjara.eu staff for helping me update this tutorial. (23/09/2020)

Nihilism

Until there is Nothing left.

About nihilist

Donate XMR: 8AUYjhQeG3D5aodJDtqG499N5jXXM71gYKD8LgSsFB9BUV1o7muLv3DXHoydRTK4SZaaUBq4EAUqpZHLrX2VZLH71Jrd9k8


Contact: nihilist@nihilism.network (PGP)